White Balance
Ever seen "AWB" on your camera? It stands for Automatic White Balance, it means the camera will try to guess what grey is. Why grey and not white? Well in the digital world white is always full red, full green and full blue, we measure the brightness on a scale from 0 to 255 (in the 24 bit world), 0 means off (black) and 255 means full on (red, green or blue). If we represent the three primary colours (red, green and blue) by numbers from 0 to 255 we can represent almost any colour by three numbers, some 16.7 million in total.
Black: 0, 0, 0
White: 255, 255, 255
Red: 255, 0, 0
Green: 0, 255, 0
Blue: 0, 0, 255
Grey is essentially any of 254 combinations where all three numbers are the same, i.e. equal levels of red green and blue.
Grey: 25, 25, 25 (very dark) or 240, 240, 240 (very light)
Now, if any one of these numbers differs we can say the grey is out of balance, 240, 240, 241 for example would indicate a very slight blue tint in the grey. If we were to look at the same photo (assuming an overall blue cast) the white would still be white though, we can't have 255, 255, 256. This is why we use grey to balance the colour of a photograph and not white.
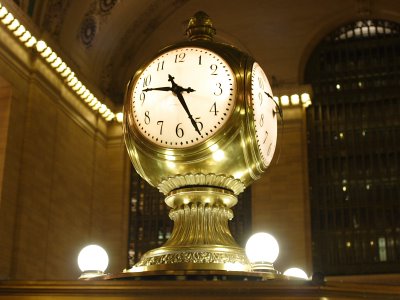
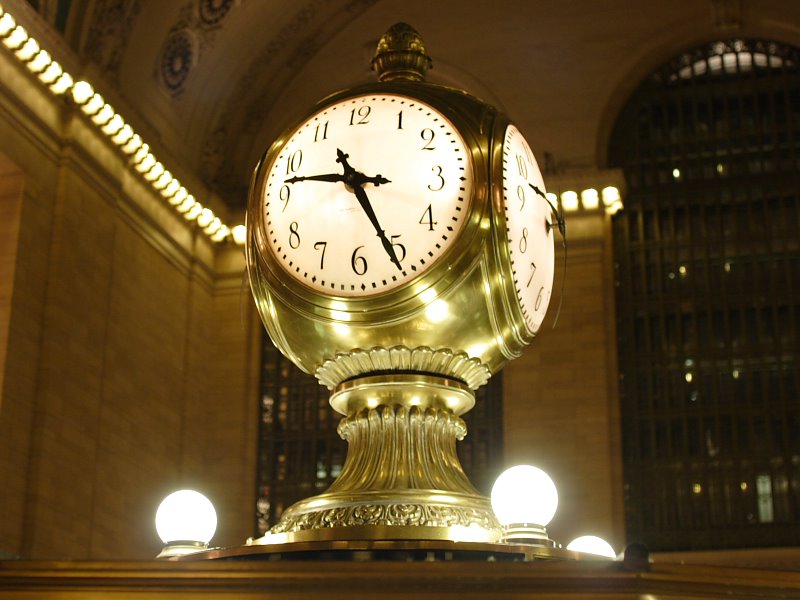
Let's see some photos and see what difference white balance can make. The photograph below was taken in Grand Central Station in New York. This is probably what you would have selected as being most true (in colour balance) if you had been in the station for some time and adapted to the light. This is balanced for "Tungsten".
The next photograph is exactly the same photograph but balanced for "daylight", this is closer to how the same scene would look if you'd just walked off a sunlight street.
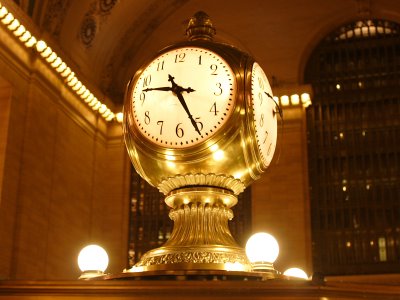
You'll notice in both cases that the white lights at the bottom of the clock are white but the greys (for example on the wall) are different.
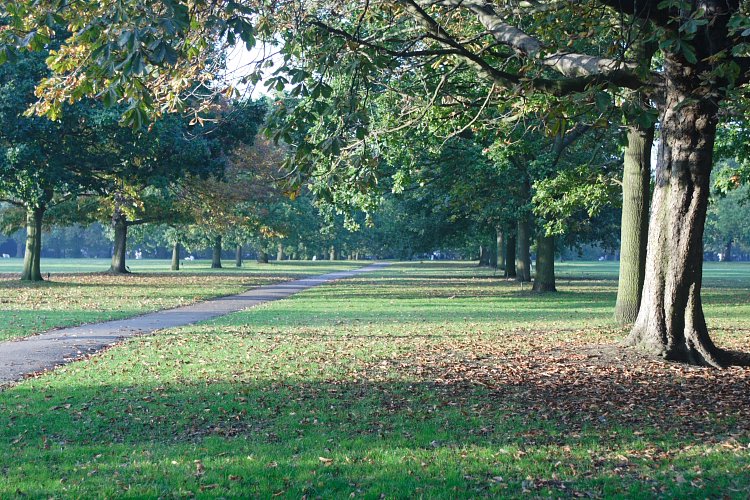
Let's take a look at the same effect outside, this is back home in London. This photograph was taken about 45 minutes before sunset, the light was a rich orange and the first photo represents (to me) what it was like that late afternoon. My eyes had been used to the light from the sky which is mostly blue and the orange light from the sun stood out, as it usually does at sunset. This photograph is balanced for daylight.
The next photograph, the same one as above, has been adjusted for tungsten light, the orange light from the setting sun it very similar to the light from a tungsten lamp so the scene looks rather "cold" and blueish. If I'd had time to adjust to the light from the sun this is how I would have seen it.

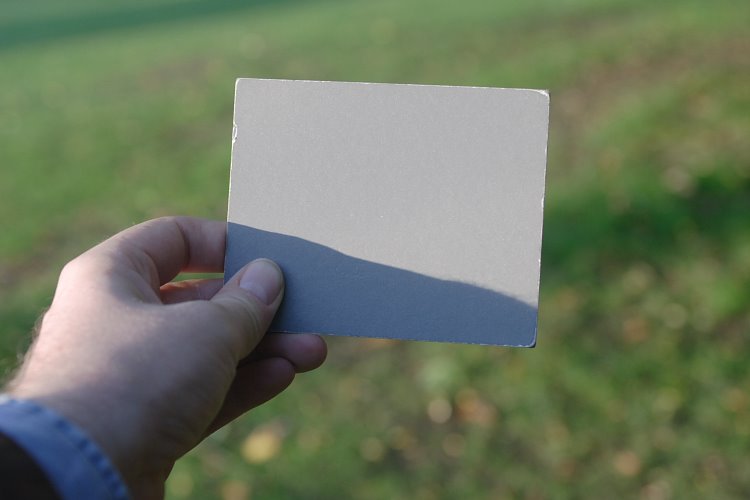
To get a "correct" colour balance you need to ideally use a grey card. This is a piece of card you can buy from most photographic shops called literally an "grey card". It has many uses and is probably the best value you well every get out of photography. It is precisely 18% grey, this is the figure all light meters and cameras use as "standard" grey. If you take a light reading off the grey card you will have the most precise light reading you can get for an average scene. Not only is it perfect for exposures it can be used to set the colour balance. I usually include a quick shot of one of my grey cards close to the scene I'm shooting. Remember during a sunset that the light changes minute by minute however a sunset is usually the time when you least care about the colour balance. The most critical time for the grey card is when shooting something that need precise colours, usually people.
This is one of my many grey card shots...
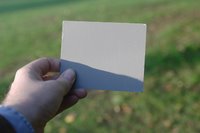
If your scene has mixed light, i.e. shadow and light try to capture both on the card or take two shots.
For ultimate control over your colour balance use RAW images if you have the choice, you can change the colour balance without any loss of quality. If you don't have a RAW option then something like PhotoShop will do a pretty good job but you will lose some detail in your highlights and shadows.
If this has been useful please add a comment, if you have other ideas or comments on things I've missed please add a comment.
Black: 0, 0, 0
White: 255, 255, 255
Red: 255, 0, 0
Green: 0, 255, 0
Blue: 0, 0, 255
Grey is essentially any of 254 combinations where all three numbers are the same, i.e. equal levels of red green and blue.
Grey: 25, 25, 25 (very dark) or 240, 240, 240 (very light)
Now, if any one of these numbers differs we can say the grey is out of balance, 240, 240, 241 for example would indicate a very slight blue tint in the grey. If we were to look at the same photo (assuming an overall blue cast) the white would still be white though, we can't have 255, 255, 256. This is why we use grey to balance the colour of a photograph and not white.
Let's see some photos and see what difference white balance can make. The photograph below was taken in Grand Central Station in New York. This is probably what you would have selected as being most true (in colour balance) if you had been in the station for some time and adapted to the light. This is balanced for "Tungsten".
The next photograph is exactly the same photograph but balanced for "daylight", this is closer to how the same scene would look if you'd just walked off a sunlight street.

You'll notice in both cases that the white lights at the bottom of the clock are white but the greys (for example on the wall) are different.
Let's take a look at the same effect outside, this is back home in London. This photograph was taken about 45 minutes before sunset, the light was a rich orange and the first photo represents (to me) what it was like that late afternoon. My eyes had been used to the light from the sky which is mostly blue and the orange light from the sun stood out, as it usually does at sunset. This photograph is balanced for daylight.

The next photograph, the same one as above, has been adjusted for tungsten light, the orange light from the setting sun it very similar to the light from a tungsten lamp so the scene looks rather "cold" and blueish. If I'd had time to adjust to the light from the sun this is how I would have seen it.
To get a "correct" colour balance you need to ideally use a grey card. This is a piece of card you can buy from most photographic shops called literally an "grey card". It has many uses and is probably the best value you well every get out of photography. It is precisely 18% grey, this is the figure all light meters and cameras use as "standard" grey. If you take a light reading off the grey card you will have the most precise light reading you can get for an average scene. Not only is it perfect for exposures it can be used to set the colour balance. I usually include a quick shot of one of my grey cards close to the scene I'm shooting. Remember during a sunset that the light changes minute by minute however a sunset is usually the time when you least care about the colour balance. The most critical time for the grey card is when shooting something that need precise colours, usually people.
This is one of my many grey card shots...
If your scene has mixed light, i.e. shadow and light try to capture both on the card or take two shots.
For ultimate control over your colour balance use RAW images if you have the choice, you can change the colour balance without any loss of quality. If you don't have a RAW option then something like PhotoShop will do a pretty good job but you will lose some detail in your highlights and shadows.
If this has been useful please add a comment, if you have other ideas or comments on things I've missed please add a comment.
posted by John T Davies at 1:35 AM
2 comments
![]()